Microcontroller: AVR ATtiny85
2019-12-06
About
This documentation gives a kind of microcontroller programming from scratch. I used the ATtiny85 for this example. IMHO its simplest, smallest, ... and a good starting point. The aim was:
- Code a programm (preferable in C) and run it on the uC.
- The wiring, powering, is all done manually.
- No ready-to-use embedded single boards, or other comfortable chips, sticks.
Tools
Used tools in this doc.
- dmesg: list kernel ring buffer
- lsusb: list usb devices
- avrdude: for programmer, transfer code from computer to microcontroller
- gcc-avr: compiler for AVR
- avr-libc: AVR C library
- optional tools
- binutils-avr: tools like assembler, linker
- gdb-avr: debugger for
Example: main.c
#define F_CPU 8000000UL

#include <avr/io.h>
// /usr/lib/avr/include/avr/iotn85.h
#include <util/delay.h>

/*
led the LED blink each 500ms
*/
int main (void) {

   DDRB |= (1 << PB0);

   while(1) {
       PORTB ^= (1 << PB0);
       _delay_ms(500);
   }

   return 0;
}
- Step 1: we need to bring our program to uC (microcontroller)
- Step 2: run the uC
Step 1: compile, build and flash
In order to bring our program to the uC we need a elf format. To be short. These are the steps for it:
avr-gcc -mmcu=attiny85 -Os -c main.c  -o main.o
avr-gcc main.o -o main.elf
avr-objcopy -O ihex -j .text -j .data main.elf main.hex
avr-size --mcu=attiny85 -C main.elf
avrdude -p attiny85 -c usbasp -U flash:w:main.hex:a
The connection between the computer and microcontroller is done with a programmer. In my case its a USBasp. For more: https://fischl.de/.
Usually the USBasp will have a ISP 10 pin cable witch is wired to the relevant pins in ATtiny85.
AVRISP mkII is also a good choice. It's just hard to find a original one and its expensive. You also have to extra power you uC.
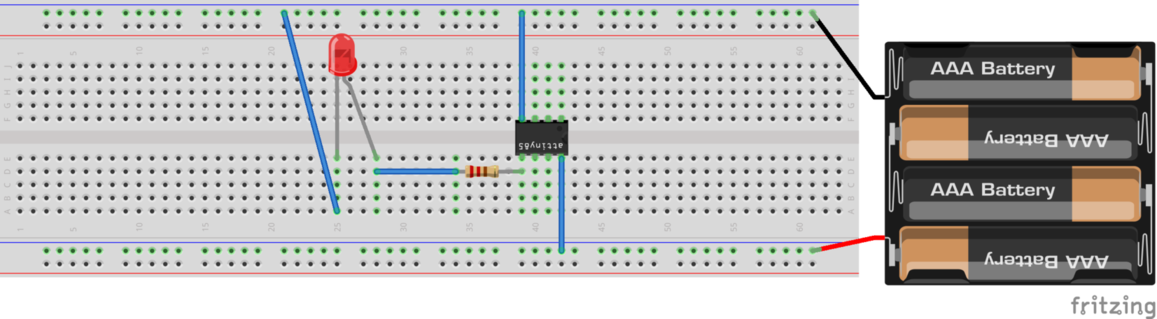
Step 2: running
After flashing process the program is loaded into the ATtiny85. Wire a circuit with a led to PIN 5 on ATtiny85 and power it up.
circuit
- the led will glow every 500ms with flashed main.c example
cheatsheet
- list supported uController:
avrdude -p? - check connection between programmer (e.g. USBasp, AVRISP, ...):
avrdude -p attiny85 -c usbasp
or
avrdude -p t85 -c usbasp
electricity
- power-bus in breadboard (+ and - lines)
- red cable is +
- black cable is -
- integrated circuit (IC) = chips comes with DIP (dual in-line package) for the middle gab in breadboard
Atmel ATTiny85
Reset   1   8   VCC (5V)
        2   7	SCK
        3   6	MISO
GND     4   5	MOSI
Serial Peripheral Interface
- SCK: Serial Clock
- MOSI: Master Output Slave Input
- MISO: Master Input Slace Output
USB to TTL Serialadapter
- check connection with
dmesg - connect with
minicom - convert TTL logic to RS232
- USB serial converter
ISP AVR
- 10 or 6 pins
- In System Programming
- use with:
avrdude -p attiny85 -c avrispmkII
Repository
- https://github.com/leventarican/microcontroller